Smooth and Even = Perfect Period Finish
Ultimately, a perfect period finish comes down to a smooth, glassy look and even shading on all parts of the piece of furniture. Choices of materials and the technique you use are important as well. But the patience and skill to prep the surface, both initially and between coats, is worth learning. The enjoyment of a job well done is lasting.
Sanding… and Sanding Again
THoM kits come with a pretty smooth surface on them, but there are three types of sanding that I usually do.
Prior to Assembly
First, the butt ends need a careful sanding with a 220 grit paper to help smooth them out (if they will show when finished). Then I will usually give them a light coat of polyurethane to keep them from going super dark when stained. If the butt end (ugly, spongy end cuts) is to be glued, as with drawer sides, don’t sand. The open fibers hold glue better.
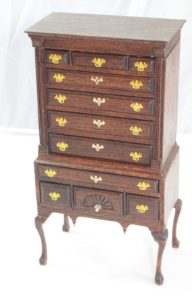
The second place that usually needs sanding are any grooves that have been cut for other pieces to fit into, like on chests of drawers. I will normally check the fit and then run a small, square file or a folded piece of 220 grit sandpaper down through there so that it is clean and ready for glue. If the fit is real tight then a little bit more sanding may be needed. Snug is good, but tight makes it hard to position things correctly.
After Assembly
Finally, after the piece is assembled, I use 320 or 400 grit to prepare all of the surfaces that will show when the piece is complete. The fine grit prepares the surface for stain. Plus, it gets rid of any blemishes that have happened during storage or assembly. I also do some work between coats of stain and poly, but we can cover that in the tip on staining.
A word of caution about edge detail: Don’t do much sanding at the edges or square corners. The wood is quite soft and the edges will round off very easily. That can be good if you are intending to make a piece look worn, but wear patterns need to be made in places that make sense. We’ll cover that technique in the advanced tips on wear and distressing.
Stains and Staining
Minwax
Okay, here comes my opinion, which you are welcome to ignore: I really like Minwax stains. And their polyurethane. And their pre-stain. Oh, and their stain pens!
Sorry to gush or sound like a commercial, but there you have it. I buy a tiny can of whatever shade or finish and it lasts for ages. I can get it about anywhere and the prices are reasonable. The pens are a little pricey, but they are amazing little tools (and they are refillable, if you are a die hard.) See my review of stain pens for more info. Stick with what you trust and you will be well on your way to a Perfect Period Finish.

Step one for staining is (oddly enough) not staining, but pre-staining. Pre-stain is a Minwax product that you apply to the wood a few minutes before the stain. It helps to even out the finish and gives you more time to work on the details. It raises the grain, too, helping you to get smoother, as well as more even finishes.
If you are going for period authenticity then your choice of stain should match your piece. Dark stains like walnut or mahogany for Queen Anne furniture. Cherry or pecan or a dark stain for Chippendale. Early American for Hepplewhite or rustic furniture. I find the pens excellent for drawer fronts and edges where pooling of stain could be a problem. Having both the can and the pen version of my favorite stain shades is a real time saver. If you don’t want to spring for the pens, a cotton swab will work, too. Change out the swab often.
Build Up to the Shade You Want
Plan to do a few coats of stain. Work it to get the right shade and evenness of finish. Between coats it is helpful to run a bit of 0000 steel wool over the surfaces to smooth them out. Staining can bring up little fibers in the wood that need to be worked off. A smooth surface is especially important when you are preparing for the gloss coat(s) to come.
Follow the directions on the can for mixing, storage, etc. As for the actual application of the stain, there are different schools of thought. Some like to use a rag or a Q-tip to apply the stain, thereby applying and removing the excess in one step. You soak a corner of a cotton rag with a little stain and rub it in, sweeping away any excess as you go.
Some prefer doing the application with a brush then removing the excess with a rag or paper towel. This technique delivers more stain and usually requires less coats. I prefer it for the first coat since it is easier to soak stain down into imperfections this way. Then I do subsequent coats with a Q-tip or stain pen. That way I can even out the finish by adding stain only to lighter areas, for instance.
There is a spray technique, too, which I have never used. You need several light coats with thinned varnish. Leaves no brush marks, so it gives excellent shine. However, you need the compressor and air brush, plus a vented spray hood and temps of 75 degrees or higher. This was apparently the method used on the pre-constructed furniture sold by X-Acto in the early 1980’s.
Poly Who? Shiny Finishes
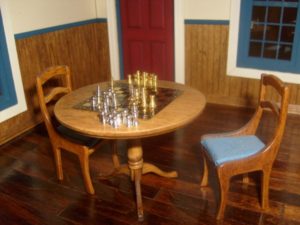
Shiny finishes in Colonial times were achieved with oils or varnishes of various kinds. Combined with certain techniques, such as “French finish” shellac, varnishes can produce a very glossy finish and excellent protection for wood. Oils, such as Tung, offer good protection and are easy to apply, but have a low sheen. It is up to you to decide, based on what use a piece of furniture will be put to, to decide how glossy your finish should be. Perhaps a fine dining table should have a French finish, a wardrobe a simple varnish, and a tavern table a tung oil finish.
Again, I recommend Minwax poly. It comes in several varieties and level of gloss. Use a high gloss to simulate a French finish and a semi-gloss for standard varnish. Tung oil takes a long while to dry and takes a number of coats to do correctly. You may prefer a satin poly to simulate the oil finishes.
Have Patience With the Process
Surface prep is the key to a good finish. Make sure to smooth out the horizontal surfaces especially well. I use fine steel wool (000 or 0000) followed by a moist rag to prep before the first coat and between the first and second coats. I run my finger over the surface to find rough spots and make sure they are removed before the next coat goes on. If you are using oil, wiping with a rag between coats is usually good enough.
The first coat of finish is going to sink into the wood, which is what you want, so always do at least two coats. I use a good quality, fine-bristle brush and as few strokes as possible to coats thoroughly, but thinly. Follow the instructions on the can for temperature and drying times and let one coat dry hard before using the steel wool or you’ll leave slivers in the finish.
One final tip: only mix polyurethane by stirring, never by shaking, at least not when preparing to use it. Shaking causes bubbles that can destroy all of your hard work smoothing. Stay patient and you will be rewarded with a perfect period finish every time.
What is Your Favorite Finish?
Do you stain or paint? Do you have a favorite stain color or brand? Join the discussion below, or on the THoM Facebook page.
I have tried one walnut finishing kit this year and several mahogany kits. The stains have been usable with a lot of stirring, years of standing need a lot of stirring to get the pigments suspended again, the condition varied a bit from bottle to bottle, some needed a bit of solvent added to help blending the stain. When well mixed, both the base stain and the glaze stain produced good results. Unfortunately almost all of the clear finish topcoats I have seen have the resins split out and are borderline un-reclaimable. I have tried adding acetone to them, which helped, but the resin drops out on standing a few minutes even with a very fast solvent. I have been able to use the clear finishes by thinning, filtering, and mixing when applied with an airbrush, but you are going to need a minimum of three coats to get a decent appearance. In general I should say the way the kit was stored probably has a lot to do with whether the stains and finish will be usable or not, I saw a spectrum of awful to almost OK in the clear finishes and they came from all over the country.
I just found this wonderful website and have already learned a lot to help me improve the quality of my work when putting my kits together. Thank you for your great advice. I also love the history you’ve provided.
Hi, I left a comment the other day about using a magnet wrapped in a rag to get up all the steel wool dust. I see that you have deleted it — why? I used to make full-sized Bartley kit furniture and it was a great help; now I’m making miniatures and it works just as well. I love your website and I thought I was contributing something useful — sorry if I overstepped.
I thought you might like a tip I use when finishing full-sized furniture that I am now applying to miniatures. I love using 0000 steel wool to rub out finishes — big and small — but the steel wool “dust” is always an issue. Tack cloths don’t get everything. I wrap a magnet in a piece of cloth or a paper towel and pass it over the piece. All of the dust from even the most intricate carving ends up on the cloth. Don’t use a bare magnet or you will never get the dust off of it. It’s such a simple fix but most people have never thought of it. My husband came up with it 20+ years ago when we were refinishing our 200-year-old floors by hand. Happy building!
Thank you. Sounds like it would work great.
I am so glad to see this information. Just started back up to purchasing my kits again. I used to do this when I was a child. Receiving the kits was pure joy for me, but I had the most fun putting them together! I just brought my kit from the Esty website. Going to order more.
Great information on the stain for different pieces. Just what I was looking for. Thank you for sharing all this great information.
Does anyone know whether the original finishing kits from THoM are still usable?
T
Thank you for building this site, what a trip down memory lane, I have recently restarted my miniatures hobby and Im so glad I kept the kits that are unopened. Sad to hear they are no longer available as they once were, that was exciting seeing them come in the mail! I will refer to this site often as I look for these kits on ebay. thanks again!
Maggie